Skip to the content Back to Top

The City of Richmond, B.C., uses Inmagic DB/TextWorks to manage the minutes of council and committee meetings as well as their municipal archives collections. This database has been available for City staff to search for many years, but Andornot has just helped the City to launch this database publicly, along with a new option for the public to see the voting records of councillors. This extra functionality was requested by Council and thanks to the flexibility of DB/TextWorks, the City Clerk’s Department was able to adjust the database so that this voting data could be extracted.

This database of council and committee meeting minutes is now publicly searchable online at https://www.richmond.ca/cityhall/council/councildecisions/about.htm using an interface developed by Andornot and based on Inmagic WebPublisher PRO.

City of Richmond Council Decisions Search Results

Users can search for meetings and decisions of interest by keyword, date, subject, personal name, and committee name. Results show the most recent meetings first, and are usually available online once the minutes have been adopted, usually within about a month of the meeting.

Voting Record. A tabular display of the voting record of the current mayor and council is available at https://www.richmond.ca/cityhall/council/votingrecord.htm We used the open-source Tabulator javascript library, pulling data exported to JSON format from the same DB/TextWorks database as the full council minutes search above.

City of Richmond Council Voting Record

The tool allows citizens to view the voting record of each mayor and council member on each topic of each council and committee meeting, with options to limit their view by date and keyword. Users may click links to view the full minutes of the meeting, and click through to the record in the above search using the record’s permalink.

The City was able to capitalize on their existing software and ongoing use and expertise with DB/TextWorks. Andornot’s expertise with DB/TextWorks, JSON and web development was key to quickly putting all the pieces together for a successful launch.

There are often opportunities to extract data and repurpose it in a different format. In this case we were able to research and implement a solution for the voting record quickly and effectively.

Recently we had a new client come to us looking for help with several subscription-based VuFind sites they manage, and ultimately to have us host them as part of our managed hosting service. This client had a unique challenge for us: 3 million records, available as tab-separated text files of up to 70,000 records each.

Most of the data sets we work with are relatively small: libraries with a few thousand records, archives with a few tens of thousands, and every so often, databases of a few hundred thousand, like those in the Arctic Health bibliography.

While VuFind and the Apache Solr search engine that powers it (and also powers our Andornot Discovery Interface) have no trouble with that volume of records, transforming the data from hundreds of tab-separated text files into something Solr can use, in an efficient manner, was a pleasant challenge.

VuFind has excellent tools for importing traditional library MARC records, using the SolrMarc tool to post data to Solr. For other types data, such as records exported from DB/TextWorks databases, we’ve long used the PHP-based tools in VuFind that use XSLTs to transform XML into Solr's schema and post it to Solr. While this has worked well, XSLTs are especially difficult to debug, so we considered alternatives.

For this new project, we knew we needed to write some code to manipulate the 3 million records in tab-separated text files into XML, and we knew from our extensive experience with Solr that it's best to post small batches of records at a time, in separate files, rather than one large post of 3 million! So we wrote a python script to split up the source data into separate files of about 1,000 records each, and also remove invalid characters that had crept in to the data over time (this data set goes back decades and has likely been stored in many different character encodings on many different systems, so it's no surprise there were some gremlins).

Once the script was happily creating Solr-ready XML files, rather than use VuFind's PHP tools and an XSLT to index the data, it just seemed more straightforward to push the XML directly to Solr. For this, we wrote a bash shell script that uses the post tool that ships with Solr to iterate through the thousands of data files and push each to Solr, logging the results.

The combination of a python script to convert the tab-separated text files into Solr-ready XML and a bash script to push it to Solr worked extremely well for this project. Python is lightning fast at processing text and pushing data directly to Solr is definitely faster than invoking XSLT transformations.

This approach would work well for any data. Python is a very forgiving language to develop with, making it easy and quick to write scripts to process any data source. In fact, since this project, we've used Python to manipulate a FileMaker Pro database export for indexing in our Andornot Discovery Interface (also powered by Apache Solr) and to harvest data from the Internet Archive and Online Archive of California, for another Andornot Discovery Interface project (watch this blog for news of both when they launch).

We look forward to more challenges like this one! Contact us for help with your own VuFind, Solr and similar projects.

Java is undergoing some considerable licensing changes, prompting us to plan an all-out move from Oracle Java 8 to OpenJDK Java 11 this Spring for every Solr instance we host. I have been running covertly about the hills setting traps for Java 11.0.1 to see what I might snare before unleashing it on our live servers. I caught something this week.

Dates! Of course it's about parsing dates! I noticed that the Solr Data Import Handler (DIH) transforms didn't handle making created dates during ingest. (In DIH, we use a script transformer and manipulate some Java classes with javascript. This includes the parsing of dates from text.) Up until now, our DIH has used an older method of parsing dates with a Java class called SimpleDateFormat. If you look for info on parsing dates in Java, you will find years and years of advice related to that class and its foibles, and then you will notice that in recent times experts advise using the java.time classes introduced in Java 8. Since SimpleDateFormat didn't work during DIH, I assumed that SimpleDateFormat was deprecated in Java 11 (it isn't actually), and moved to convert the relevant DIH code to use java.time.

Many hours passed here, during which the output of two lines of code* made no goddamn sense at all. The javadocs that describe the behaviour of java.time classes are completely inadequate, with their stupid little "hello, world" examples, when dates are tricky, slippery, malicious dagger-worms of pure hatred. Long story short, a date like '2004-09-15 12:00:00 AM' produced by Inmagic ODBC from a DB/Textworks database could not be parsed. The parser choked on the string at "AM," even though my match pattern was correct: 'uuuu-MM-dd hh:mm:ss a'. Desperate to find the tiniest crack to exploit, I changed every variable I could think of one at a time. That was how I found that, when I switched to Java 8, the same exact code worked. Switch back to Java 11. Not working. Back to Java 8. Working. WTF?

I thought, maybe the Nashorn scripting engine that allows javascript to be interpreted inside the Java JVM is to blame, because this scenario does involve Java inside javascript inside Java, which is weird. So I set up a Java project with Visual Studio Code and Maven and wrote some unit tests in pure Java. (That was pretty fun. It was about the same effort as ordering a pizza in Italian when you don’t speak Italian: everything about the ordering process was tantalizingly familiar but different enough to delay my pizza for quite some time.) The problem remained: parsing worked as-written in Java 8, but not Java 11.

I started writing a Stack Overflow question. In so doing, I realized I hadn't tried an overload method of java.time.format.DateTimeFormatter.ofPattern() which takes a locale. I had already dotted many i's and crossed a thousand t's, but I wanted to really impress anyone reading the question that I had done my homework, because I hate looking ignorant, so I wrote another unit test that passed in Locale.ENGLISH and, ohmigawd, that solved the problem entirely. If you have been following along, that means that "AM/PM" could not be understood by the parser, even with the right pattern matcher, without the context of a locale, and obviously the default locale used by the simpler version of DateTimeFormatter.ofPattern() was inadequate to the task. I tested and Locale.ENGLISH and Locale.US both worked with "AM/PM" but Locale.CANADA did not. Likely the latter is my default locale, because I do reside in Canada. Really? Really, Java? We have AM and PM here in the Great White North, I assure you.

I don’t know if this a bug in Java 11. I’m merely happy to have understood the problem at this point. Just another day in the developer life, eh? Something that should be a snap becomes a grueling carnival ride that deposits you at the exit, white-faced and shaking, with an underwhelming sense of minor accomplishment. How do you explain to people that you spent 8 hours teaching a computer to treat an ordinary date as a date? Write a blog post, I guess. Winking smile

* Two lines of code. 8 hours of frustration. Here it is, ready?


import java.time.LocalDateTime;
import java.time.format.DateTimeFormatter;
import java.util.Locale;

public class App {
  public LocalDateTime Parse (String dateText, String pattern) {
    DateTimeFormatter parser = DateTimeFormatter.ofPattern(pattern, Locale.ENGLISH);
    LocalDateTime date = LocalDateTime.parse(dateText, parser);
    return date;
  }
}

Last week we published a blog post on our favourite Omeka plugins. This week we focus on one in particular, the CSV Import plugin. This plugin is included in every site hosted through Digital History Hub, our low-cost Omeka hosting platform.

One of Omeka's many strengths is the built-in data entry screens, based on Dublin Core fields. While there's a small learning curve to understanding DC, once mastered, it provides just the right set of metadata to describe anything you might want to put in an Omeka site, whether an artifact, photograph, document, map, etc.

But what if you already have a database of this sort of information and want to publish most or all of it in an Omeka site? Perhaps you're using the ever-popular Inmagic DB/TextWorks database management system, but don't yet have your records searchable online, or want to use Omeka's Exhibit Builder plug-in to mount an online virtual exhibit featuring a portion of your collection. Re-entering all that metadata into Omeka one record a time would be onerous. This is where the CSV Import plug-in comes in!

As the name implies, this plugin allows you to quickly import many records in a batch from a text file. You simply choose a suitable text file, map fields from your source into Omeka's Dublin Core schema, set a few other values and very quickly your records will be available in Omeka for review, further editing or simply ready for searching. The only main feature missing from this plugin is the ability to import PDFs, documents, photos and other media files that are saved locally on your computer or network. To bulk import these files, they need to be accessible on a web server with a URL to the file in your database. Note that this may not be as challenging to set up as you may think; there are always ways to work around issues like this, so don't hesitate to contact us for help.

Here's a step by step guide to using this plug-in with DB/TextWorks and Omeka. The procedure for exporting data from other databases will vary of course, but the principles remain the same. As always, do contact us for help !

Mapping Fields

Start by reviewing Omeka's Dublin Core fields on the Item entry screen and think about where data from your database should go. 

You may want to prepare a simple two column list mapping fields from your data source into the Dublin Core fields, like this:

DB/TextWorks Field NameOmeka Dublin Core Field Name
TitleTitle
Material TypeFormat
AuthorCreator
Corporate AuthorCreator
Publication DateDate
ISBNIdentifier

etc.

You don't need to populate every Omeka DC field of course, just the ones that make sense for your data. And you can merge multiple fields from your database into one Dublin Core field in Omeka. To learn more about each DC field, read the brief note on the Omeka data entry screen, or visit http://dublincore.org/documents/dces/ for more detailed information.

Note that there is also a plugin called Dublin Core Extended Fields which adds even more fields. If you have a particularly complex database and feel the need to preserve and fully represent all or most fields, this might be for you. In our view, though, keeping things simple is better, and was precisely why DC was developed, to have a brief, common set of fields that could be used to describe almost anything.

Choosing Data to Export

When you get to the step of importing records into Omeka, you have the option of assigning one Item Type to all incoming records, and only one. The Item Type determines which additional metadata elements are available when editing the record. For example, the "Still Image" Item Type adds fields for Original Format and Physical Dimensions. If your source data contains information that is available in these extended fields and you wish to import it, or add it after by editing imported records in Omeka, you may wish to export records in groups by Item Type. E.g. all "still images", then all "Moving Images", etc. You can then import these in batches and specify the correct Item Type for each. The additional fields specific to that Item Type will then be available for import from your source data.

Exporting From DB/TextWorks

If your data contains special characters like accented letters or letters from outside the Latin alphabet, the file must be encoded as UTF-8 for Omeka to import it correctly. DB/TextWorks offers several text encoding options, so before exporting data, choose Tools > Options > Text Encoding and under "Output file encoding", choose the UTF-8 option (applies to v15.0 or later of DB/TextWorks).

To export a selection of records, search for them first, then select File > Export. 

Save the file somewhere handy, with a .txt or .csv extension. 

In the Export Options dialogue, make the following choices:

Export File Format: Delimited ASCII

Delimiter options:

Record Separator {CR}{LF}

Entry Separator |

Quote Character "

Field Separator , (only commas are supported for import)

Select the "Store Field Names in First Row" option

If any of your fields are of the type Rich Text, be sure to export those as HTML. That HTML can be preserved during the import to Omeka by selecting the HTML option for the field on Step 2 of the import (see below).

Records to Export: choose to export either the records you searched for with "Export Current Record Set" or the entire database with "Export Entire Textbase"

Fields to Export: select only those fields that you included in your field mapping

Optionally you can save these options as a profile for re-use again later.

Complete the export and note how many records were exported (so you can verify that the same number are imported into Omeka).

Importing Data into Omeka

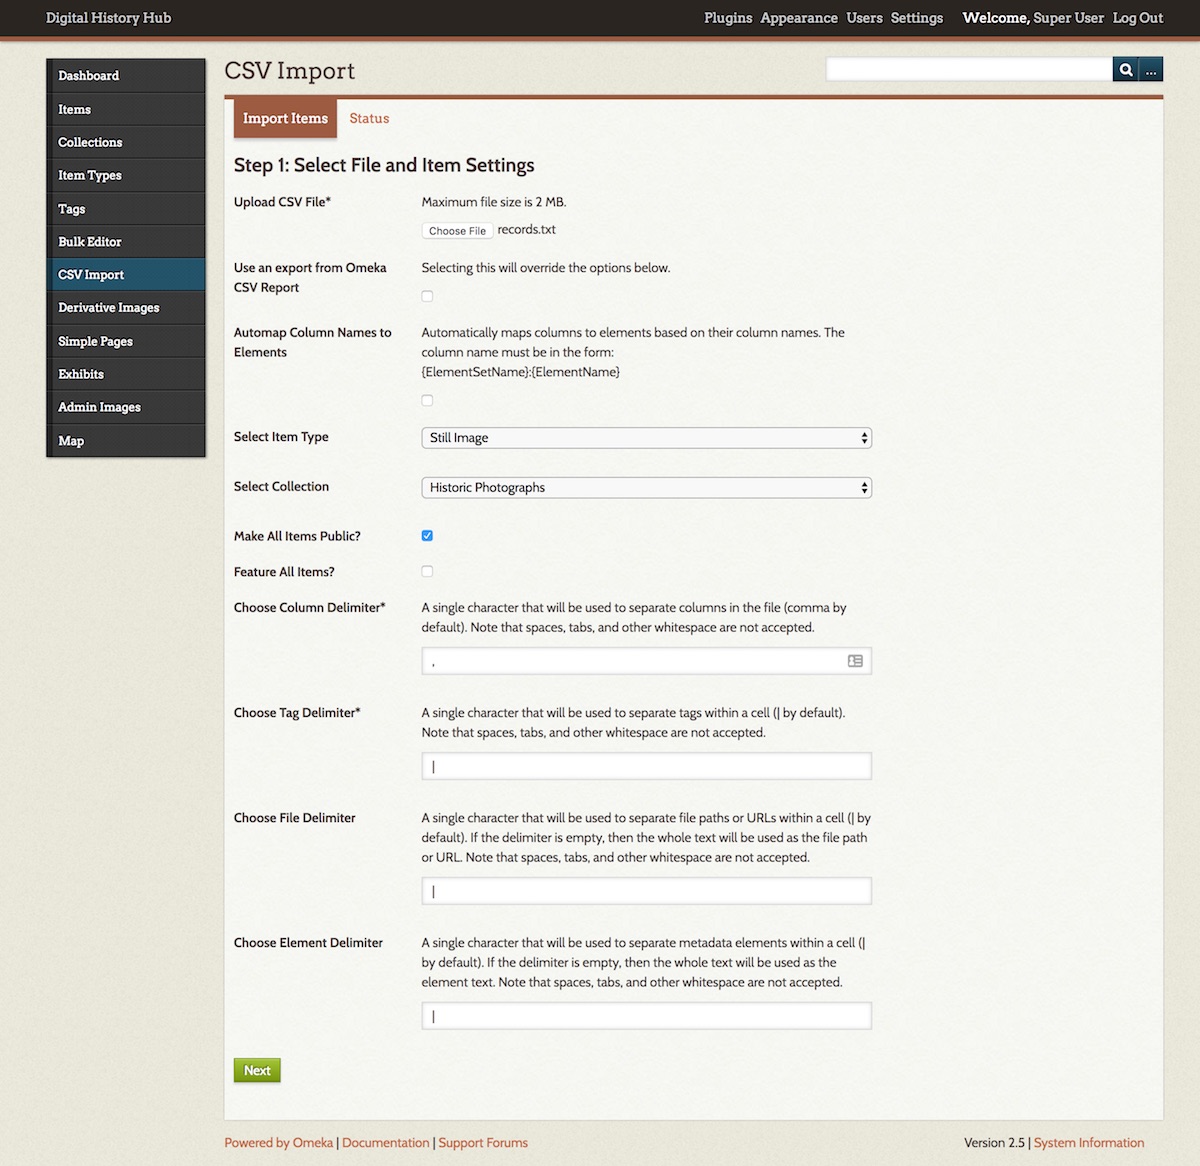
With the export to a comma-separated text file complete, login to your Omeka site and select the CSV Import option in the menu. If that option isn't available, you'll need to install and activate this plugin first.

In Step 1 of the CSV Import, select your exported data file, then set the following options on this page:

If your database field names happen to be identical to those in Omeka and have “DublinCore” in their names (e.g. DublinCore:Title), you can select the Automap Column Names to Elements option. For all others (most of you!), deselect this option.

If importing different types of records in batches, select the Item Type appropriate to each batch.

Choose the following delimiters to match your export from DB/TextWorks:

Column Delimiter , (matches the Field Separator in the DB/TextWorks export)

Tag Delimiter | (matches the Entry Separator in the DB/TextWorks export)

File Delimiter | (matches the Entry Separator in the DB/TextWorks export)

Element Delimiter | (matches the Entry Separator in the DB/TextWorks export)

Optionally, choose to assign all items to a Collection or make all items Public. 

If you're importing a large number of records, you probably don't want to Feature all of them, as it's more common to select a small set of Items to feature on the home page of Omeka.

Continue to the next step.

In Step 2, you will select the Omeka DC fields into which your data source fields will be imported, using your field mapping as a guide. 

Click the Use HTML checkbox if this data includes HTML markup (e.g. if it's a Rich Text Format field in DB/TextWorks and during export, you included that field and chose to export it as HTML).

For source fields which contain tags, select the Tags option instead of selecting a field to import the data to.

For source fields which contain URLs to files, select the Files option instead of selecting a field to import the data to. This will cause the import to fetch those files and add them to Omeka. Fetching many large files will take quite a while, so if this is your very first import, you might be best to try importing just a small data set with or even without this files option, to work out kinks in your whole procedure.

Reviewing Imported Data

If you imported a small number of records, you can review each one. If you imported a large number, you may wish to spot check a random sample, to make sure all the data ended up where you expected it, that records are public or not, featured or not, in a collection or not, etc.

If there are problems, the Undo Import feature is your new best friend. Find it back in the CSV Import plugin and use it to remove the records just imported.

Need Help?

Need help with any of this? Contact Andornot and we'll be glad to work with you on this.


The principles of good database design suggest that every record in a database should have something that uniquely identifies it and distinguishes it from every other record. In a small library catalogue, it may be that every title is different from every other, but in any larger database, there's a good chance there will be more than one very, very similar record. 

When it comes time to do more with this information, such as import it into Inmagic Presto or the VuFind discovery interface, or clean-up some older records, it's imperative that every record be able to be uniquely identified.

It's also good practice to have fields that track the date a record was created and the date it was last modified, for similar reasons.

It's very easy to create these fields in your database structure, whether in Inmagic DB/TextWorks or another system, when you are first building the database. But what can you do if you already have a database with thousands of records, and no unique record identifier or dates created or modified? With DB/TextWorks, it's very easy to add this information even after the database was built and populated. 

There are four main steps to this:

  • Backup all your existing records, just in case of a problem.
  • Verify that these fields don't already exist.
  • Add the fields to the database structure.
  • Populate the fields with data.

Backup the Database

1. Open DB/TextWorks but don't open a database. Select Manage Textbases > Dump Textbase. 

2. Browse to the location of your database and select it. 

3. Next, pick a folder to store the export in and give it a meaningful name.

4. When the export is complete, you'll now have a backup you can reload, just in case anything happens.

Verify Fields

5. Open the database in DB/TextWorks and, if it has password protection, be sure to sign in with the Master password, so you have full access.

6. Select Maintain > Edit Textbase Structure.

7. In the Edit Textbase Structure window, scroll through the list of fields to check that you don't already have a unique ID and/or dates created or modified fields. You may be able to identify them by Name (e.g. RecordID, RecordCreated, RecordModified) or by Type (e.g. Automatic Number, Automatic ID, Automatic Date).

Add Fields

8. If none are found, select Edit Fields. You will now enter information to create the new fields listed below. Be sure to select Add rather than Change after entering information for each new field.

Field NameRecordID
Field TypeAutomatic Number
Other SettingsBy default, the automatic numbering will start at 1 and increment by 1; there's usually no reason to change this.
Field NameRecordModified
Field TypeAutomatic Date
Other SettingsUpdate Entry: When Record is Created or Modified.
Date Components and Format: you may choose whether to include the time, or only the date, and which format. We usually select Date Only and Short Date Format, unless your data will be imported into Presto, in which case Date and Time is best.
Field NameRecordCreated
Field TypeAutomatic Date
Other SettingsUpdate Entry: When Record is Created.
Date Components and Format: you may choose whether to include the time, or only the date, and which format. We usually select Date Only and Short Date Format, unless your data will be imported into Presto, in which case Date and Time is best.

9. With all of the information entered, click Finish and OK to save your changes to the database structure.

Add Data to Existing Records

10. Select Search > Find All Records to retrieve all records from the database. This may take some time, but you can click the Stop button in the bottom status bar of DB/TextWorks to stop the formatting on the screen.

11. When the records have finished loading, select Records > Batch Modify. The trick now is to make a perfectly innocuous change to every record in your database. As DB/TextWorks goes through every one, since the database now has Automatic Number and Automatic Date fields, they will automatically be populated. 

If you happen to have an unused field in your database, you could populate it with some value, and then remove that again in a second batch modification.

Or, you could add a new field and use batch modification to populate it with some value. You can then either leave it as-is, perform another batch modification to delete the data from the field, or delete the field altogether.

The batch modification feature in DB/TextWorks is quite sophisticated and an explanation of it would expand this blog post to unwieldy dimensions. However, the help built-in to DB/TextWorks explains all the options, including new features added to recent releases. 

12. When the batch modification is complete, every record will now have a unique identifier and the date the record was last modified. To verify, search for some records and view the ID and dates.

13. Now that you have a unique ID, you can configure DB/TextWorks to record it in the textbase log file every time a change is made to a record. This has proven invaluable to several clients this month when accidental changes were made to records. We were able to use the log to undo those changes. To configure your textbase log, select Maintain > Edit Textbase Structure again, then Log File. Select your RecordID field as the First Identifying Field, and something like title as the Second.

If you need any help with the above, just let us know.

Categories

Let Us Help You!

We're Librarians - We Love to Help People