Last week we published a blog post on our favourite Omeka plugins. This week we focus on one in particular, the CSV Import plugin. This plugin is included in every site hosted through Digital History Hub, our low-cost Omeka hosting platform.
One of Omeka's many strengths is the built-in data entry screens, based on Dublin Core fields. While there's a small learning curve to understanding DC, once mastered, it provides just the right set of metadata to describe anything you might want to put in an Omeka site, whether an artifact, photograph, document, map, etc.
But what if you already have a database of this sort of information and want to publish most or all of it in an Omeka site? Perhaps you're using the ever-popular Inmagic DB/TextWorks database management system, but don't yet have your records searchable online, or want to use Omeka's Exhibit Builder plug-in to mount an online virtual exhibit featuring a portion of your collection. Re-entering all that metadata into Omeka one record a time would be onerous. This is where the CSV Import plug-in comes in!
As the name implies, this plugin allows you to quickly import many records in a batch from a text file. You simply choose a suitable text file, map fields from your source into Omeka's Dublin Core schema, set a few other values and very quickly your records will be available in Omeka for review, further editing or simply ready for searching. The only main feature missing from this plugin is the ability to import PDFs, documents, photos and other media files that are saved locally on your computer or network. To bulk import these files, they need to be accessible on a web server with a URL to the file in your database. Note that this may not be as challenging to set up as you may think; there are always ways to work around issues like this, so don't hesitate to contact us for help.
Here's a step by step guide to using this plug-in with DB/TextWorks and Omeka. The procedure for exporting data from other databases will vary of course, but the principles remain the same. As always, do contact us for help !
Mapping Fields
Start by reviewing Omeka's Dublin Core fields on the Item entry screen and think about where data from your database should go.

You may want to prepare a simple two column list mapping fields from your data source into the Dublin Core fields, like this:
| DB/TextWorks Field Name | Omeka Dublin Core Field Name |
|---|
| Title | Title |
| Material Type | Format |
| Author | Creator |
| Corporate Author | Creator |
| Publication Date | Date |
| ISBN | Identifier |
etc.
You don't need to populate every Omeka DC field of course, just the ones that make sense for your data. And you can merge multiple fields from your database into one Dublin Core field in Omeka. To learn more about each DC field, read the brief note on the Omeka data entry screen, or visit http://dublincore.org/documents/dces/ for more detailed information.
Note that there is also a plugin called Dublin Core Extended Fields which adds even more fields. If you have a particularly complex database and feel the need to preserve and fully represent all or most fields, this might be for you. In our view, though, keeping things simple is better, and was precisely why DC was developed, to have a brief, common set of fields that could be used to describe almost anything.
Choosing Data to Export
When you get to the step of importing records into Omeka, you have the option of assigning one Item Type to all incoming records, and only one. The Item Type determines which additional metadata elements are available when editing the record. For example, the "Still Image" Item Type adds fields for Original Format and Physical Dimensions. If your source data contains information that is available in these extended fields and you wish to import it, or add it after by editing imported records in Omeka, you may wish to export records in groups by Item Type. E.g. all "still images", then all "Moving Images", etc. You can then import these in batches and specify the correct Item Type for each. The additional fields specific to that Item Type will then be available for import from your source data.
Exporting From DB/TextWorks
If your data contains special characters like accented letters or letters from outside the Latin alphabet, the file must be encoded as UTF-8 for Omeka to import it correctly. DB/TextWorks offers several text encoding options, so before exporting data, choose Tools > Options > Text Encoding and under "Output file encoding", choose the UTF-8 option (applies to v15.0 or later of DB/TextWorks).
To export a selection of records, search for them first, then select File > Export.
Save the file somewhere handy, with a .txt or .csv extension.
In the Export Options dialogue, make the following choices:
Export File Format: Delimited ASCII
Delimiter options:
Record Separator {CR}{LF}
Entry Separator |
Quote Character "
Field Separator , (only commas are supported for import)
Select the "Store Field Names in First Row" option
If any of your fields are of the type Rich Text, be sure to export those as HTML. That HTML can be preserved during the import to Omeka by selecting the HTML option for the field on Step 2 of the import (see below).

Records to Export: choose to export either the records you searched for with "Export Current Record Set" or the entire database with "Export Entire Textbase"

Fields to Export: select only those fields that you included in your field mapping

Optionally you can save these options as a profile for re-use again later.

Complete the export and note how many records were exported (so you can verify that the same number are imported into Omeka).
Importing Data into Omeka
With the export to a comma-separated text file complete, login to your Omeka site and select the CSV Import option in the menu. If that option isn't available, you'll need to install and activate this plugin first.
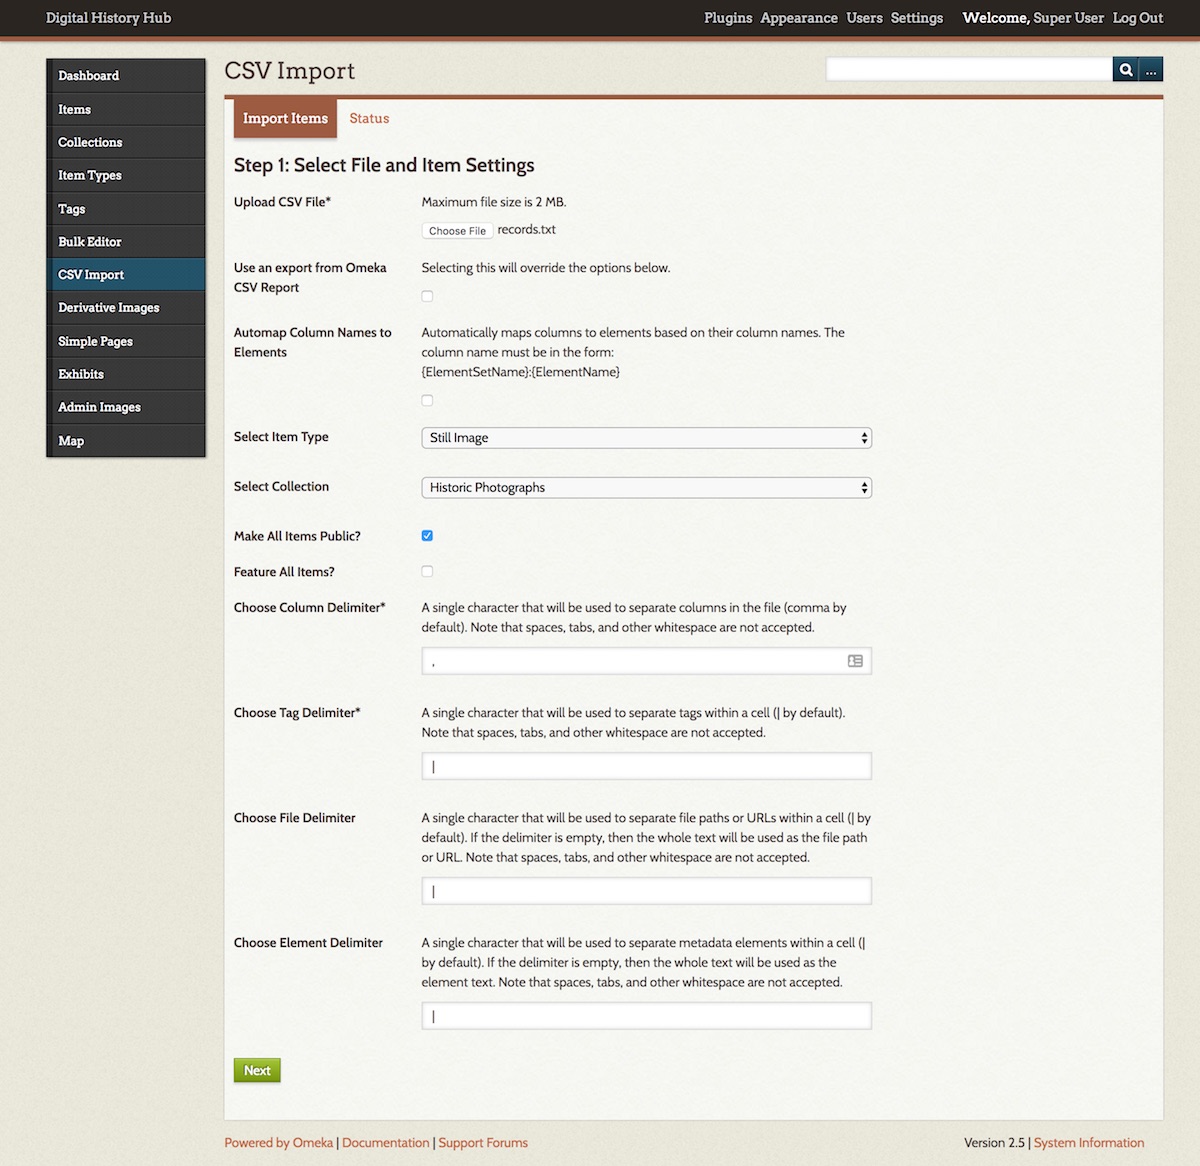
In Step 1 of the CSV Import, select your exported data file, then set the following options on this page:

If your database field names happen to be identical to those in Omeka and have “DublinCore” in their names (e.g. DublinCore:Title), you can select the Automap Column Names to Elements option. For all others (most of you!), deselect this option.
If importing different types of records in batches, select the Item Type appropriate to each batch.
Choose the following delimiters to match your export from DB/TextWorks:
Column Delimiter , (matches the Field Separator in the DB/TextWorks export)
Tag Delimiter | (matches the Entry Separator in the DB/TextWorks export)
File Delimiter | (matches the Entry Separator in the DB/TextWorks export)
Element Delimiter | (matches the Entry Separator in the DB/TextWorks export)
Optionally, choose to assign all items to a Collection or make all items Public.
If you're importing a large number of records, you probably don't want to Feature all of them, as it's more common to select a small set of Items to feature on the home page of Omeka.
Continue to the next step.
In Step 2, you will select the Omeka DC fields into which your data source fields will be imported, using your field mapping as a guide.

Click the Use HTML checkbox if this data includes HTML markup (e.g. if it's a Rich Text Format field in DB/TextWorks and during export, you included that field and chose to export it as HTML).
For source fields which contain tags, select the Tags option instead of selecting a field to import the data to.
For source fields which contain URLs to files, select the Files option instead of selecting a field to import the data to. This will cause the import to fetch those files and add them to Omeka. Fetching many large files will take quite a while, so if this is your very first import, you might be best to try importing just a small data set with or even without this files option, to work out kinks in your whole procedure.
Reviewing Imported Data
If you imported a small number of records, you can review each one. If you imported a large number, you may wish to spot check a random sample, to make sure all the data ended up where you expected it, that records are public or not, featured or not, in a collection or not, etc.
If there are problems, the Undo Import feature is your new best friend. Find it back in the CSV Import plugin and use it to remove the records just imported.
Need Help?
Need help with any of this? Contact Andornot and we'll be glad to work with you on this.


